Comb and Foundation
Experiments
Writings of Chris Slade
|
|
|
|---|
|
Comb and Foundation Experiments Writings of Chris Slade |
Measuring Cell Shape, of honey bee comb |
|---|
Chris Slade (Dorset) built a topbar hive in early 1999 and stocked it with a swarm. The swarm came from Alderholt on the Dorset/Hants border on 21/6/1999.
It survived the winter well, but swarmed in late May 2000. The new queen was "lost" and the colony was found broodless in mid June.
A new queen was given in a queen cage on 18/6/2000 using fondant in the cage entrance. On 24/6/2000 the queen was still in the cage, the fondant being hard, the bees were attentive. The queen was finally released using marshmallow instead of fondant.
On 1/7/2000, larvae were seen and the bees were "happy", but very depleted in numbers " will struggle" Chris's note says.
On 16/7/2000, the queen was seen, there was brood in all stages, but very few bees. There was a propolis screen reducing the entrance to one beeway. When inspected in August there were only wasps in the hive.
Chris noticed that the cells of the comb that this colony had produced appeared "small". There had been much discussion on various Email lists about cellsize and I have been intrigued by the subject myself for some time.
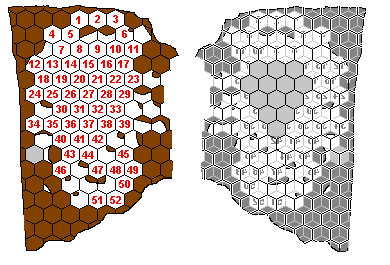
Chris cut a chunk of this comb from the second comb in from the "front". He then filled some of the cells with dental plaster so that the "plugs" so formed would give an indication of the internal size and shape of the cells. I agreed to measure the plaster plugs using a micrometer. And so the next time we met, Chris gave me a padded bag that contained the small piece of comb which I illustrate below.
|
The numbers shown in red are the same as the ones applied with ink to those cells which appeared to contain full plugs of plaster. The reverse side is shown in grey. The cells shown solid grey were filled with molten paraffin wax so that a piece containing several cells could be sectioned using a microtome and the resulting slices mounted on slides to be viewed under the microscope. The microscopic examination should show the number of cocoons present. Although the piece is illustrated and numbered with the long side of the comb shown vertical the actual attitude of the comb was with the long straight edge at the lower side and inclined at an angle of about 30 degrees to the top bar. The edge with the number 52 cell is more or less vertical. |

|
|---|
Each plug will be measured across each set of parallel sides using the number as a reference. Dimension "A" is horizontal, Dimension "B" is top left to bottom right and Dimension "C" is top right to bottom left. Where possible the plugs will be measured in three places "F" as near to comb face as practical, "M" the middle of the plug and "R" as close to the root of the cell as possible.
The following measurements were taken of contiguous runs of cells, Including only one of the walls of the outer two cells of a run. The measurements were made on the face of the plaster which was pared down with a scalpel to expose the cell walls.
| This part will eventually have some calculations on max min and overall average sizes |
Plug Measurements
|
THIS part of the page will have calculations on cell wall thickness | ||||||||||||||||||||||||||||||||||||||||||||||||||||||||||||||||||||||||||||||||||||||||||||||||||||||||||||||||||||||||||||||||||||||||||||||||||||||||||||||||||||||||||||||||||||||||||||||||||||||||||||||||||||||||||||||||||||||||||||||||||||||||||||||||||||||||||||||||||||||||||||||||||||||||||||||||||||||||||||||||||||||||||||||||||||||||||||||||||||||||||||||||||||||||||||||||||||||||||||||||||||||||||||||||||||||||||||||||||||||||||||||||||||||||||||||||||||||||||||||||||||||||||||||||||||||||||||||||||||||||||||||||||
NOTE...
* indicates possible air bubble in surface of
plaster
# indicates definite air bubble in surface of plaster

|
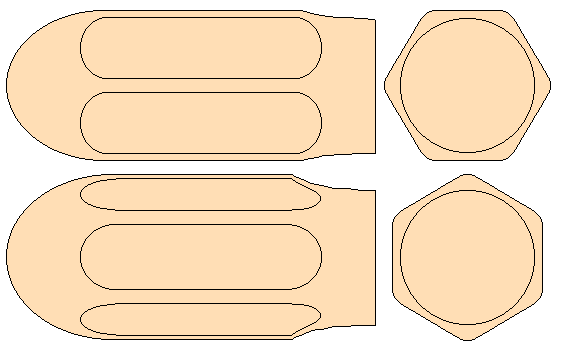
The drawing at left is of cell plug No 11 (which is a representative average for this comb) and is executed to a scale of 30 pixels per mm with an accuracy of + 2 pixels. In dismembering this piece of comb, I was struck by the length of the neck of the cells and the bullet shape of the cell bottoms even though only a few brood cycles have happened to the sample. The rounding of the hexagon corners is greater than I have previously thought and it shows how little waste there is in this shape as it is very similar to the envelope of the larva and the bee that it turns into. |
|---|
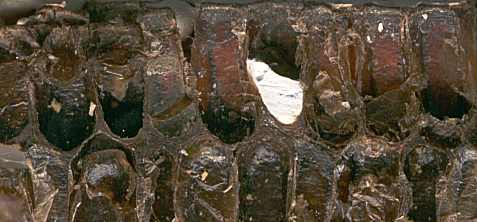
An attempt was made to make a section through the midrib of the row immediately below the row containing plugs 51 and 52. The first cut was successful and revealed that the midrib was the same thickness (by eye with magnifying glass) as the sidewall. The sample was too delicate to measure with callipers. The second cut to isolate the section was unsuccessful... The section just disintegrated.

|
This is a photograph of the section after the first piece was cut off. The white portion is part of the partial plaster plug that is to the right of cell 29. The cut has been made parallel to and through the right hand vertical faces of cells 11 and 23. |
|---|
Dave Cushman.
Page created November 2000
Written... November 2000, Revised... 30 December 2001, Revised... 23 May 2003, Upgraded... 25 March 2005, Further Upgraded... 08 January 2007,
|