Special or Unusual Frames
Frame Wiring
Frame Assembly Video
|
|
|
|---|
|
Special or Unusual Frames Frame Wiring Frame Assembly Video |
Assembly of Bee Hive Frames |
|---|
This page was written by Dave Cushman and reflects the fact he was a perfectionist. As with most things in beekeeping, there are lots of different ways of doing things. Having assembled a large number of frames without difficulty, I make notes below where I feel appropriate. This is not to discredit Dave or anyone else, but shows economies that can be made without affecting the function or life of the frame. I have made a video of how I assemble a frame. See button top left. R.P.
This is a simple task that a beekeeper will repeat many times during his (or her) life. Some may say that it is a chore, but like many things... If the preparation is done right and a methodical approach is made then the work itself passes uneventfully and the stack of new frames is finished easily and quickly.
Prepare a suitable work surface that is sturdy, solid and large enough to stack all the parts on, to do the work and to spread out all the necessary tools. Empty hive boxes are useful to stack the finished frames into.
Treat the frame assembly and the fitting of foundation as two separate jobs. Frames can be completed to the first stage in any temperature, but the fitting of the foundation and final assembly should be conducted indoors or in a heated shed.
Before the assembly itself there are some preparations to make...
First lay out all the tools in a pattern that allows them to come to hand easily.
Then unpack all the top bars that you intend to use...
Remove the foundation retaining wedge from the bar with a knife that has a short, blunt blade, but a sharp tip, clean any remaining web from the rebate in the top bar and remove a small tapered chamfer from each end of the underside of the bar as shown in the diagram below. I don't see the point of this. I have never done it and never seen it done. R.P.

Also remove the sliver of wood that still adheres to the wedge. Repeat this operation until all top bars are processed.
Before we assemble and nail the frame together we must look at what nails to use and how they should be placed.
In my opinion (and the opinion of all major equipment manufacturers) we should use 19 mm Gimp Pins (1 mm Dia Parkerised and stained) for the assembly of the frames, but 16 mm 'deep drive' panel pins should be used for the foundation fixing wedge.
Some find power stapling machines handy for putting frames together. I have done this myself in the past, but I find there is little benefit in speed and the staples are relatively expensive. There is an advantage in grip as staples up to 32 mm in length can be used.
Nail Placement
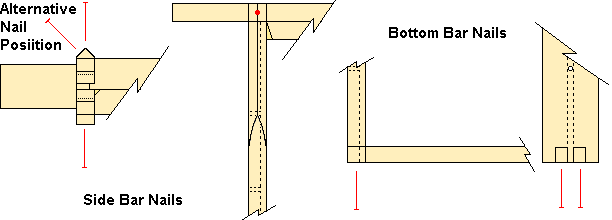
The mistake most often made is to nail the bottom bars through the side of the sidebar (at first sight this seems a good idea as it saves two nails per frame, but it makes the disassembly of the frames very difficult). I don't see this as a mistake at all. On many occasions I have seen the bottom bar stuck to the top bars of the frames below or the floor of a WBC by the bees. When removing the frame the bottom bar is left behind. This is often the case when re-assembled, when the nails are a loose fit in the holes. How many beekeepers re-use frames anyway? R.P.
By nailing each bottom bar individually into the end grain of the sidebar... the nails will pull out easily when you want to put fresh foundation in the frame in 3 or 4 years time. This is exactly the point I'm making above. They come out in use!R.P.
Another thing that is often done wrong is that a nail is placed vertically downwards into the side bar. This is disastrous as the nail head impedes the scraping action of the hive tool when cleaning burr and brace comb from the top surface of the bar. In addition the nail grip in the end grain is not enough to handle the weight.
Having sorted out our nails and where to place them we must think how we will put the nails in... There are two methods:-
Warrington pattern hammer (4 Oz Wt) or... Pin Push Tool.
Both have their advocates, but I 'sit on the fence' as I use a hammer for Gimp pins and a pin push for panel pins.
Take a topbar and two side bars and push the notches in the sides onto the narrow necks of the topbar, ensuring that the grooves in the sides (if any) face inwards, they will stay in place as they are a tight fit (if they are too tight a little judicious use of a craft knife will adjust the situation, but they are designed to be tight). Then with the topbar held in one hand and your lightweight hammer in the other... Place the bottom tips of the side bars firmly and squarely against the top surface of your bench and lightly tap the topbar at the points where the side bars sit (this ensures firm seating of the bridle joints). Lay the assembly flat and put in the nails for this side of the frame. Turn over and insert the other 2 nails. Next with the topbar resting on the bench and with the sides pointing upwards add one bottom bar (on the same side of the frame as the 'meaty' side of the topbar). The ends of the bottom bar must be exactly flush with the outside face of the sidebar. Your partly assembled frame should then look like the drawing below.
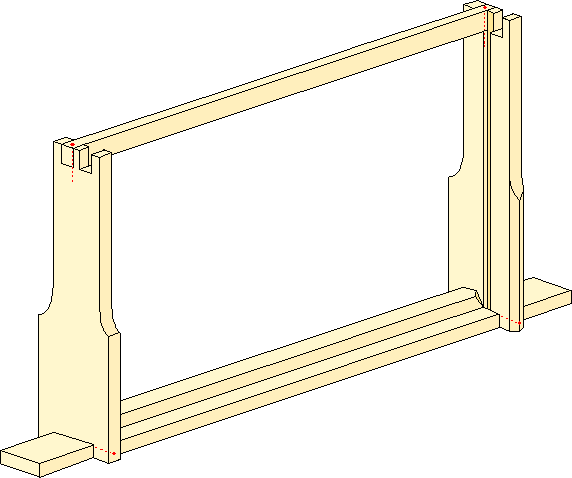
If your side bars do not have foundation grooves, make certain that the 'V's are placed so that they occur in the positions in the drawing. This ensures that the 'V's always mate with a flat whichever way round the finished frame is placed in a group.
Inspect the part assembled frame for defects (missing nails, groove outside) and check for squareness of assembly. Then stack them in one of the empty boxes and repeat until all frames reach this stage.
The next operation is the fitting of the foundation and the last bottom bar, but before we detail this we should look at the methods of wiring in pre-wired foundation as this has a bearing on the placement of the panel pins to fix the wedge bar.
|
|
|---|
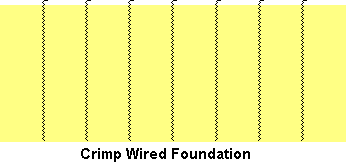
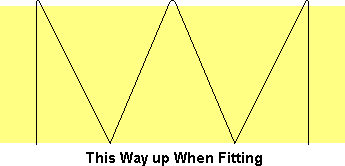
The crimped vertical style of wiring is more common in USA whilst the zigzag method is more commonly used in UK.
The vertical wires extend a few millimetres above the top edge of the foundation and this extension is bent at right angles to form a positive gripping action when the wedge bar is in place.
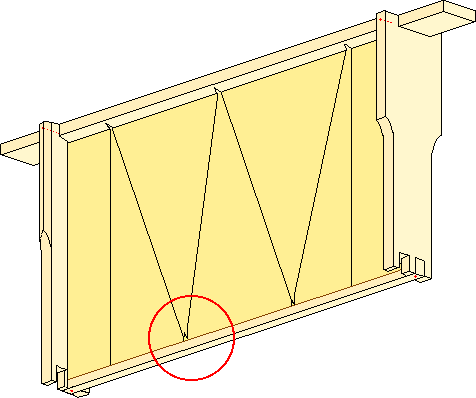
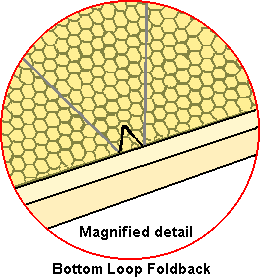
The zigzag wired foundation needs a little preparation to make it ready to go into the frames... The two small loops that extend from the bottom edge of the foundation must be turned back onto the surface of the foundation so as to ensure that no wire protrudes from the bottom of the frame once it is assembled. (The bees tend to build accretions of wax on any exposed wire and in removing this with your hive tool the wire will be snagged and will rip through the comb rather like a cheese cutter.) The three top loops should be bent at right angles to perform the same gripping function as with the vertical wired type.
Lay the part finished frame flat on the bench with the single bottom
bar downwards...
Slide the foundation into the grooves ensuring that the wire ends or
loops are uppermost (The foundation must slide freely in the groove...
trim a small strip from one side if required) (use a metal rule and a
Pizza Cutter)...
Fit the wedge bar to trap the protruding wires or loops and push the 3
panel pins diagonally through the wedge bar so that the pins also go
through the loops or pass between wires for the crimped wire type. The
angle of penetration should be such that the points of the nails
cannot protrude through the other side of the timber. (This would
disrupt normal frame cleaning as the hive tool would be impeded.)
I find that only
2 nails are adequate and they don't have to go through the loops.
R.P.
The bottom edge of the foundation should rest about halfway between the top and bottom edges of the bottom bar. (This gives room for the foundation to stretch under the weight of bees that will be drawing it.)
Fit and nail the second bottom bar being careful not to buckle the bottom edge of the foundation.
|
|
|---|
This view shows how the frame should look just before you fit the wedge bar.
The view below shows the fitting and nailing of the wedge bar.
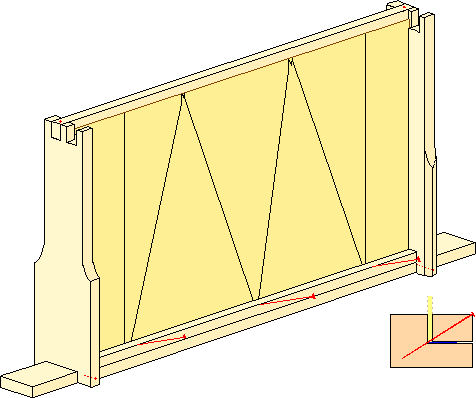
Inset shows cross section at nailing point.
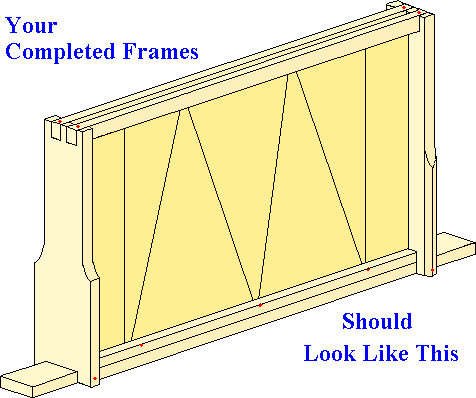
Repeat until all frames have been completed. Once a rhythm and a method of placing the tools, so that they are in easy reach, is established... The 'chore' becomes a pleasure.
Dave Cushman.
Page created Summer 2000
Page updated 07/12/2022
Written... Summer 2000, Revised... 07 & 08 April 2002, Upgraded... 06 April 2006,
|