Comb and Foundation
Assembly of Frames
Embedding Tools
Embedding Board
|
|
|
|---|
|
Comb and Foundation Assembly of Frames Embedding Tools Embedding Board |
Wiring Bee Hive Frames for Unwired Foundation |
|---|
Some Beekeepers do not use wire reinforced foundation, but instead use unwired foundation in frames that have been strung with wire. The wire then being embedded in the wax.
The purpose of wiring bee hive frames, is so that unwired foundation is supported for the drawing of flat, high quality, honeycomb. If this honeycomb is for collecting honey that is to be extracted in a centrifugal extractor, the wiring will also help the comb to resist forces that tend to burst or break honeycomb.
Some other Beekeepers use nylon mono filament (fishing line) or thin twine for this purpose.
I myself use nylon... Shakespeare, extra sure strength OMNI 3000, 0.45 mm 9.0 kg is the type of line I use.
I do the embedding using a soldering iron that has been modified as per the details on the embedding tools page. This is not hot enough to damage the nylon line, but I do the work on a workbench that I use for all my wax working. This bench has a central heating radiator mounted directly underneath it and I work in a warm room (warmer than most people can stand... Maybe 28° or 29° C, as this keeps the pain in my muscles and joints lower.
Whichever is your choice of reinforcing material the methods are similar.
I will use the term 'wire' to mean any of the possible materials.
The 'wire' is threaded through holes, (usually 1.5 mm), drilled or punched in the frame side bars, (details of the hole drilling positions can be found in the Drawings section.
I use a drilling jig which is illustrated on another page, so that consistent results may be achieved.
The frames should be assembled as detailed under frame assembly to the stage where the top bar has two side bars and one bottom bar. Then the 'wire' is fed through the holes... One end is anchored... The 'wire' is pulled taught... Then the other end is anchored.
Some use small brass eyelets to stop the thin wire from cutting into soft timber.
There are many ways of fixing the ends of the 'wire'. Some use 9 mm gimp pins and wrap several turns around the shank then hammer the pin home. My personal method is to whittle tapered wooden pegs or spiles which are dipped in PVA glue and hammered in hard, trapping the 'wire' in place. When the glue is dry (24 hrs) I trim the excess length from the pegs (being careful not to cut the nylon!).
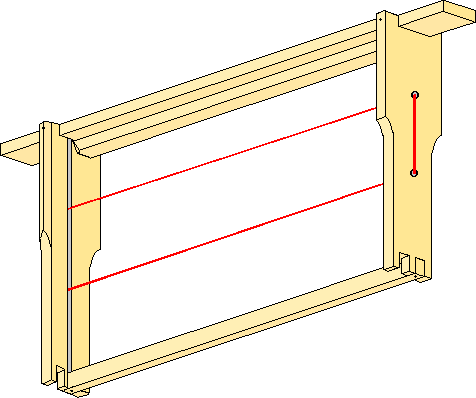
When the 'wire' is in place your frames should look like this:-

There are many fads and fancies in the way in which the 'wires' are strung. There are many diagrams in old beekeeping books that illustrate various patterns. The straight forward horizontal pattern of wiring seems to me to be as good as any and better than most!
You should finish all the frames in the batch to this stage before proceeding with the insertion of the foundation and embedding of the 'wire'.
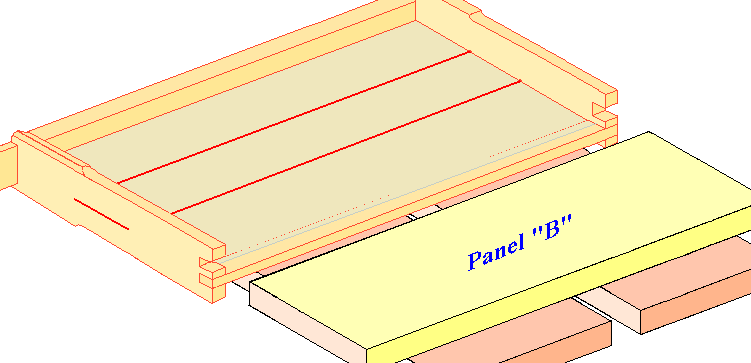
The next stage requires an embedding board and one or other of the embedding Tools listed.
Slide your unwired foundation into the groove with the 'wires' underneath... Then invert the frame on to the panel of the embedding board thus trapping the foundation between the top surface of the panel and the 'wires'. Run your heated embedding tool along the 'wires' exerting a moderate amount of pressure and allowing enough time for the wax to melt and then solidify again.

Fit the wedge bar and second bottom bar according to the instructions given under "Frame assembly", but ignoring the comments about trapping the wires.
Dave Cushman.
Page created summer 2000
Written... Autumn 2000, Revised... 23 February 2002, Revised... 11 April 2002, Upgraded... 06 December 2005, Addition... 14 August 2006,
|