|
|
|
|---|
Rational Bee Hive Roof |
|---|
|
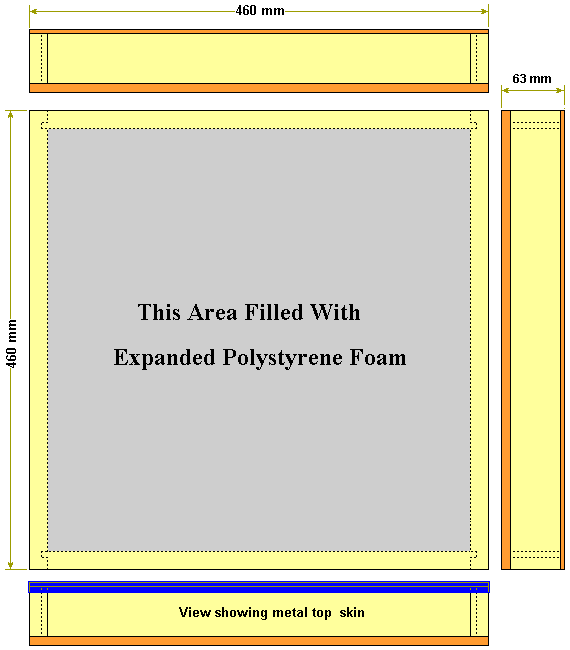
The Grain should run along the longest dimension of any part. Cutting of parts (all dimensions in mm). |

|
|---|
| Qty | Length | Width | Thickness | Material | Usage |
|---|---|---|---|---|---|
| 1 | 460 | 460 | 9 | Exterior Plywood | Lower Panel |
| 1 | 460 | 460 | 4 | Exterior Ply or Hardboard | Top Panel |
| 2 | 460 | 50 | 18 | Pine | Long sides of rim |
| 2 | 436 | 50 | 18 | Pine | Other rim parts |
| 1 | 461 | 461 | 10 | Spangled Galvanized | Sheet Metal Cover |
| 1 | 424 | 424 | 50 | Expanded Polystyrene Foam | Insulation |
|
If you wish to use this item in a system that uses bottom bee space, then add the Rim Parts. Use without the rim if top bee space is required.
Note 1. Assemble using a waterproof PVA type glue using nails or screws. The version as drawn above is simple to make and very durable. If petroleum jelly is used on the on the main panel and linseed oil or outdoor quality enamel paint is used on the outer edges, the item will give many years of good service. |

|
|---|
The roof is fitted to the top of the hive using "Z" springs to hold it firmly in place.
Many of the original prototypes of this type of roof were made using thin plywood or hardboard (Masonite) as the undersurface. All of those with thin plywood, sagged in the centre, reducing the bee space above the frame top bars, with consequent brace comb aggregation. Hence the comment about the 9 mm thickness, which many might think was overkill. Although the hardboard that was used is only about 4 mm thickness, many of the original ones are still in use and are flat, whereas some others that appeared to be identical material sagged like the thin plywood and have since been replaced with 9 mm ply.
Writing date... Unknown, Revised... 14 August 2001, Revised... 23 May 2002, Upgraded... 01 December 2005,
|