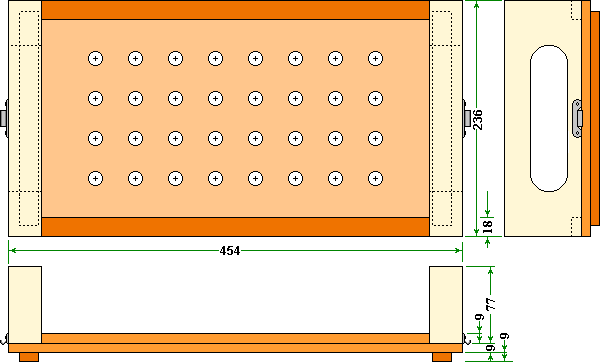
This type of lid will fit both the standard and Marburg versions of the swarm box.
The material used for the main plate of this item is waterproof exterior grade plywood 9 mm in thickness. The handle parts are softwood and the handles will benefit from the edges of the slots being rounded for comfort while carrying.

This lid is positioned on the box and located by the two strips of 9 mm ply, 214 mm long, that are placed 11 mm from each end in the same way as described for the standard lid.
The handles are made from 33 mm x 77 mm stock in order that any boxes in storage are the same height as the standard ones, to aid stacking.
Stiffening strips 18 mm x 9 mm ply are shown along the long edges in the drawing, but the size is not critical.
The matrix of holes will depend on the type of queencell cup holder that you intend to use and the depth that you wish the cells to penetrate into the interior of the box. I have shown 32 holes of 16 mm diameter, but my own are bored with a tapered cutter so that the hole is 12 mm on the underside and about 15 mm on the upper surface. This arrangement suits the 'old style' of yellow Jenter plug that I use. The number of holes could be less or more according to your way of thinking. I actually prefer not to use the group of four holes at each end, because I think that the bees are better able to provision and work on the cells in the warmer central region of the box.

Using this method, acceptance can be assessed very easily by pulling out a plug and placing your finger over the hole to prevent bees escaping. It is amazing how much wax will be deposited on the rim of the plastic cell cup in as little as ten minutes. As this is about the time it will take to graft the cells you can look for acceptance as soon as you have finished the grafting as the first cups will be around ten minutes old. Should a larva not have been accepted it is a simple matter to remove the first grub using a 'cotton bud' and re-graft immediately.
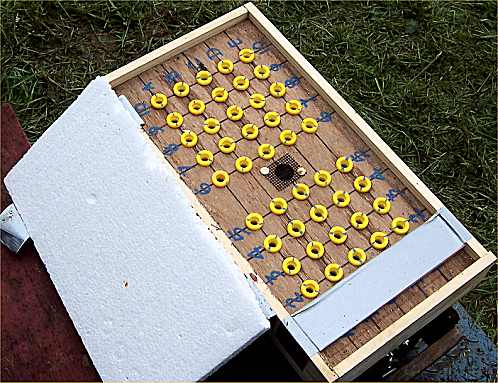
The lid depicted in the photograph at right belongs to John Perkins and was photographed by Sandra Unwin at the 2007 open day at Cornbrook Bee Farm, organised by Michael Collier.
John's version holds 50 grafts in total but only 45 plugs were in use at the time of the photograph, John also uses expanded polystyrene insulation and a separate lid, whereas I used a plate of 6 mm plywood that just rested on the tops of the yellow plugs and located inside the handles and rim. John used the insulation because he has longer distances to travel than I did.
The lids are kept securely in place by strong toggle fasteners that need accurate placement to ensure absolute interchangeability of different lids.
Lid for filling queen cages with attendants

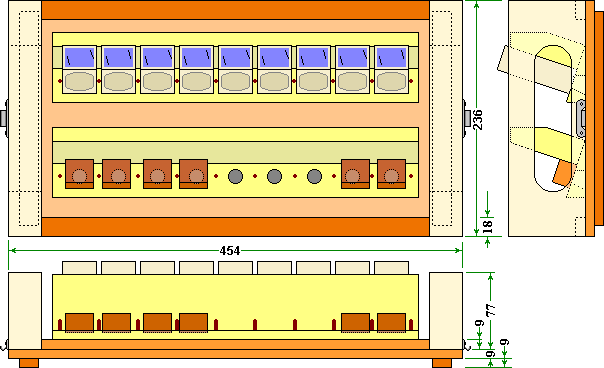
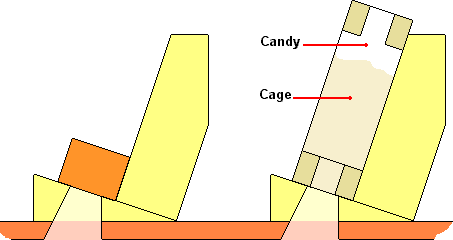
 For the sake of clarity this drawing is not quite in proportion, in practice you will get more cages per row than the nine that I have shown. Some of the stations are shown with cages, some with slips of wood blocking the holes and some open. The drawing at right shows the cross section through the operative portion of the rack of cages.
By using the Marburg box in accordance with the directions you will have young bees with a long life expectancy to groom and feed the queens on their journey.
The cages are prepared with candy, before the mesh cover is stapled down, the slip of cardboard shown blue is stapled over the candy end hole and the cages are placed with their open holes over the holes in the 'filling stations' small hardwood pegs ensure that the holes line up to enable free passage of workers. The cages lean backwards for stability, 15 degrees is a suitable angle for this and that is a 'fixed stop' on many woodworking machines. The tapered holes can be bored using a 'cone cut' type of cutter.
When you can see that a cage has an adequate number of workers for escort duty (I reckon six is as good a number as any) you can remove a cage and place your thumb over the open hole in one simple movement. Then place a fresh cage on the filling station or you can just cover the hole with a slip of wood to stop loss of bees. Catch your queen and place her head first in the hole and with a light tap from your forefinger on her back end propel her right into the cage, then place your cork or bung in the hole and repeat until the order is filled.